
There are many beautiful Q24s sailing about, so it’s only right and proper that we have a page devoted to them. So here we are! If you own a 24, you’re welcome to post. I’m happy to add pictures, too. To post a new comment, you’ll have to scroll to the very bottom of this page- all the way down. I’ve managed to change the formatting to display just the newest comments first, so scrolling down is no longer so tedious. All of the older comments are still here though. Just follow the link at the bottom of this page.


We have a Yamaha 8 hp and never seem to turn it more than half throttle. I am a big fan of its electric start. I modified my stern to be able to tilt it up and out of the water
https://quickstep21.wordpress.com/the-quickstep-24-fleet/
Justin – interested in your stern modification – I think I have a problem with intake plugging with unit in water all time – was modification difficult?
terry
I recently purchased a Quickstep 24 and need a outboard with a little more power than our Torqueedo 2 hp electric. What is the recommended hp and shaft length? Thanks for hosting this community forum!
Victoria, Quickstep originally recommended an 8HP motor with a 20 inch shaft. I use my 24 around NJ, NY around the upper lower bays, Long Island sound and immediate coastal waters and found an 8hp to be fine. If I had the money to spend I would try a 6hp 25″ shaft but my current Tohatsu has no plans of giving up any time soon. Check Craigslist, search under ‘boat parts’ and use Tohatsu, Nissan, Mercury along with 8hp or 6hp or 9.8hp. There is usually one or two for sale up here in new condition and a year old or so for 1000.
Tohatsu, Nissan, and Mercury motors are all the same inside, all made by Tohatsu. Only the 6 hp longshaft comes with a charging system to charge your battery. Also, the Tohatsu and Nissan 9.8hp engines are the same as the 8HP except they have a different carburetor which gives them more power. So for the same price used…why not get a 9.8. They weigh the same.
You can buy Tohatsu and Nissans and Honda motors online. I got mine at this place but there are others or you can buy locally for a few hundred dollars more.
http://onlineoutboards.com/ I had a pleasant purchase experience. FedEX delivered my engine. Check for locations of authorized repair locations before buying any engine brand. West Marine sells Mercury engines but if it breaks you need to take it to a service shop in your area, so what is the advantage of giving West 300 dollars more? Manufacturer websites provide this information. I have had no problems with my engine but before I bought it I called a local service shop and asked if they had any objections to me bringing in an internet engine for service and there was no push back at all.
Remember…the longer the shaft and the higher the horsepower the greater the force which will be applied to your Q24’s teak motor mount. Don’t get crazy…any more than 8HP or so is wasted due to boat weight and hull speed anyway. Chris D.
We have a 6hp tohatsu Sail Pro with 25″ shaft. Pushes the boat at 5 kts using less than half throttle. We just brought the boat up from Marion Ma. to Winthrop Ma a 70 mile trip. We had wind for 1 hour and used the engine the rest of the time. Burned about 4.5 gallons of gas and ran great.
New to the group. Just bought a Quickstep 24 in fall of 2017 for use in eastern LI Sound and BI Sound and am thinking about changing out the 20-yr old 9.9 Yanmar for a Tohatsu 6 hp Sail Pro with high thrust prop. Think the 6 hp will be fine for me too but just want to ask question on shaft length. Tohatsu says to measure from top of transom mount edge down to bottom of hull to determine shaft length. Other sites say that adding 2-3 inches below bottom of hull can be beneficial on a non-planing hull like a sailboat. I’ll go measure tomorrow but I see from this 24 June 2016 Post that the 25″ shaft seems to work fine for you. I believe the current 9.9 is a 20″ shaft and it seemed to be fine too although I wasn’t out in anything too heavy. Any more thoughts from folks on 20 versus 25″ shaft shafts?
Thanks in advance!
Victoria, this season I am replacing the existing Honda 4 stroke 8 hp 25″ extra long shaft that I have on my 1989 Quickstep with a new one with electric start. 8hp is more than enough engine for my boat. Like others on this board, I do not run it at full throttle. I’ll be selling the old one which runs just fine but is manual start if you have any interest
Sean – is the motor still for sale?
Yes Terry, you can email me at seanabbotthome@gmail.com if you’d like any further info.
We purchased a Quickstep 24 last fall at the Chesapeake Bay Maritime Museum Auction and have been getting to know her over the winter. We had a Torqueedo electric motor on the boat (2 hp) but need a little more hp to get it in and out of the narrows. Trying to find recommendations on what hp is recommended and shaft length for optimal performance without too much drag while under sail.
Is the boat still in Maryland? I would love to get a look at a quickstep 24 if that is possible?
What is the cabin headroom in the cabin of Quickstep 24?
It is pretty low, you have to stoop over. Perfect for a six year old.
Ref: Quickstep 24 “Erin”. One os the sheaves on my masthead has failed. I would like to replace all the sheaves at on time ( boat is in the water). Does anyone know the size of the sheaves or have a drawing or picture of the masthead?
Thanks,
Mike
Mike: The standing rigging for Q24’s was and is still made by Dwyer Mast Company. The Q24 uses their DM500 section and associated parts and was Brewers original spec.
http://www.dwyermast.com
This following page shows the masthead part and some other associated fittings.
https://www.dwyermast.com/items.asp?cat1ID=20&cat1Name=&familyID=43&familyName=DM-500+Mast
I have sourced from them for my Q24 and other projects and they are quite helpful and reasonably priced considering the quality.
They may even sell you sheaves instead of the whole assm. but for 175.00 it is probably time to go for new. That way there will be no worries up there.
You can make sheaves out of delrin sheet if you have the tooling should new not be available.
Schaefer and Ronstan sell sheaves of various sizes as well as other companies.
Remember that the diameter of the sheaves is not really critical as long as they fit and do the job. No need to get hung up on size beyond width and bolt hole size. Width is important as the line must not roll off the sheave inside the masthead.
And, yes you can go up the mast on the boat and work up there while she is in the water. Gets a bit dicey though. I wanted to get down quick (antenna). I’m 175 lbs. Would not send anyone up there much heavier. Hopefully your current sheaves will handle the load.
Chris D.
Mike: Looks like Dwyer does sell the sheaves. On the second link in my previous reply click on the masthead rig and you will see the exploded view and all parts. cd
Has anyone replaced their rudder shaft bushing on a Quickstep 24.
I purchased a Quickstep 24 in the fall. I noticed the rudder has about 1 1/2 inch of space between the top of the rudder and the hull. The skeg is only about an 1 1/2 deep. What keeps the rudder from accidentally moving up and out of the skeg?
Your rudders lower pintle or skeg point is worn. Some Q24’s did not have any bearings at the bottom and the rudder simply was inserted into fiberglass which filled the lower pintle/support point. Others left at mooring without the tiller tied suffer from excessive wear. Once it wears down enough room then exists to be able to raise the rudder enough to literally lift the rudder out of the lower pintle. Not a good situation but easily fixed. I have repaired mine. It took an hour a day for a few days, had to wait a day for resin to cure before each additional step was taken. There are easy ways and not so easy but better ways. I have some pictures of my repair on a photo hosting site from a few years ago. if you are interested let me know here and I will look for the link and information.
http://s1206.photobucket.com/user/slip134/library/Quickstep%2024?sort=2&page=1
This is the link with my rudder repair pictures. I used a bronze bushing and if I had it to do again I would use a delrin bushing. Q24 rudder shaft has a lower diameter of 3/4″ and delrin bushing are available on Ebay for a few bucks. If I notice any wear in the bushing I am going to re-do it with a delrin bushing. I am concerned that the bronze bushing will cause wear on the rudder shaft. Time will tell. Anyway, I am an amateur and nothing is perfect the first time….Hope this helps..
Hi Chris
Thank you for the link. My rudder shaft and the bushing appear to be in good shape. However the bushing is level with the skeg. Yours appears to be above the skeg. My concern is the clearance at the top of the rudder below the hull. It looks normal as compared to other pictures I have looked at. The clearance would allow you to lift the rudder to remove it from the bushing if necessary. My question is what prevents the rudder from somehow rising up and popping out of the bushing? Say for example it hits a lobster pot bouy?
Mark, the rudder has to be captivated between the upper travel limit (the hull) and the lower limit (the skeg). If there is too much room between the two the rudder can lift up and pop out at the lower end as you suspect. In order to captivate the rudder between the two points you have to make the space between the two points smaller. That is what I did, I put a bushing in at a height about 3/8 inches higher than it was originally. Now there is simply not enough room for the rudder to come up and allow the lower end of the rudder shaft to pop out before the top of the rudder contacts the upper travel limit…the hull. I have seen a number of Q24’s and this is a problem with a number of them. Basically I would say it is from wear or just a sloppy build from day one. If you figure another way to repair this problem please let me know though I cannot imagine what it will be. CD
Mark: I am having trouble posting my reply and do not want to clutter the board here. The short of it is you have to create a condition where your rudder is captivated between the upper and lower support points. In my case I did it by adding material and a bushing to the lower point making the lower skeg support to be 3/8 inches higher than originally. Now the space between the upper and lower supports is smaller and the rudder shaft is captivated and the rudder can no longer pop out of the skeg. I cannot imagine another way of solving this correctly. You could put a collar around the exposed upper shaft of your rudder which will simply stop the rudder from coming up. Tie a rope around the exposed upper shaft. That would be a cheap and dirty ‘fix’. Rudder will hit the rope before the lower end comes out. As far as ‘comfort’ goes, Quickstep may have been comfortable but I was not. I have seen much more expensive boats with much sloppier work embedded in them. Hit a submerged item and your rudder pops out. Hit hard enough and your rudder shaft bends and maybe your upper rudder tube cracks or worse and then you have a real problem. If you are in the NJ area and need a hand I will be happy to work with you. Chris
Hi Chris
I didn’t realize at first, that there was narrative with the pictures. I have now learned that my boat which is also an LNUKS H.I.N. was built by Tillotson Pearson. It was built with a bushing in the pintle. My boat is a 1989 so it is a change they made the following year. There is no apparent wear on the pintle or the bushing
so they must have been comfortable with the clearance on top of the rudder.
I hope the photo link stays active in the event I need to go to this next step.
Thanks
Mark
Hi Chris
Thank you for all your feedback, it was very helpful. I will post what I come up with as a solution. I way just tie a rope on the top of the post as you suggest. Also thank you again for the info on the builders of the Quickstep 24, great research.
Mark
I would love to see the rudder repair photos- what is the password?
Hi Chris
I tried to fashion a nylon shaft collar to fit. The thickness was only half inch, but it was still too thick. I ground it down on opposite sides to clear the rudder and the hull but still to tight. I ended up using nylon wire ties. I put them together end to end and tightened them up so that the closing mechanism was on either side of the shaft. After two double sets and a single tie above them, I think I have something that will work.
Mark: Anything to take up the extra space and keep the rudder captivated. It is spring and time to launch is near so the adage about necessity being the mother of invention is invoked here. I feel compelled to say that I would not consider it ‘fixed’ at all, especially if you sail in the ocean. It is always a source of amazement how a nasty day on the water can find all the chinks in your armor all at once as well as adding a few more.
A note about wire ties. If you take one and hit the locking part with a hammer…even fairly gently they always deform and often crack and break. If your rudder moves up and down and becomes the hammer and your hull the anvil your fix will fail and settle to the bottom unseen. For that reason I like the rope fix better of the two. A rope just tied around the rudder shaft will take up the space and offer shock absorbance as well as take a pounding between the rudder and hull without complaint.
Chris D. Did you replace the upper bearing at the same time you did the lower bearing? After sailing Summer Wind for a couple of days I see there is a lot of slop on the tiller. When I had the boat out of the water, looking at the upper, it looked like it might be some sought of cutlass bearing.
I might want to pull it and replace in the fall.
Mark: There really is no upper bearing. It is a tube, pvc I presume glassed into place. It can be seen by sticking your head into the bilge area with the step removed with a flashlight. This tube wears too. Mine was anyway as were others on other boats I owned. To remove the rudder the lower skeg/pintle must be taken off to a greater or lesser degree and the rudder dropped straight down. There is not enough flex in the shaft to remove the rudder with the skeg/ pintle in the way. Upper rudder shaft is over an inch of solid bronze. Then the skeg / pintle / bushing is rebuilt with fiberglass. Sounds somewhat harder than it is. (Or you can use the method I showed you in previous posts to replace the bushing) There are several ways to fix slop in the upper. Easy one that you can do with boat in the water in less than an hour? Take a liter plastic soda bottle, cut it into strips about 8″ long as I recall, remove your tiller casting on top of the rudder shaft and feed the soda bottle strips into the tube leaving some material bent over at the top so you can remove it if you ever want to. You will probably need a puller to get the casting off as it is on pretty good with a key as well. Make sure you put the soda bottle strips all around the tiller shaft so that the soda bottle becomes a sacrificial space filling bearing which can be replaced and will also eliminate any further wear on your upper tube. It also eliminates any water that may find its way up the tube in a following sea. It can be a seasonal check item if you wish after that. I sail my boat 1000 miles a year give or take a hundred or so and the soda bottle strips are still good, in that I still have only desirable play in the tube years later. If you want the harder and more complex method, let me know. cd
http://www.harborfreight.com/3-piece-two-jaw-puller-set-40966.html
A puller like the larger one pictured here will do the job with ease.
Thanks Again for your help Chris
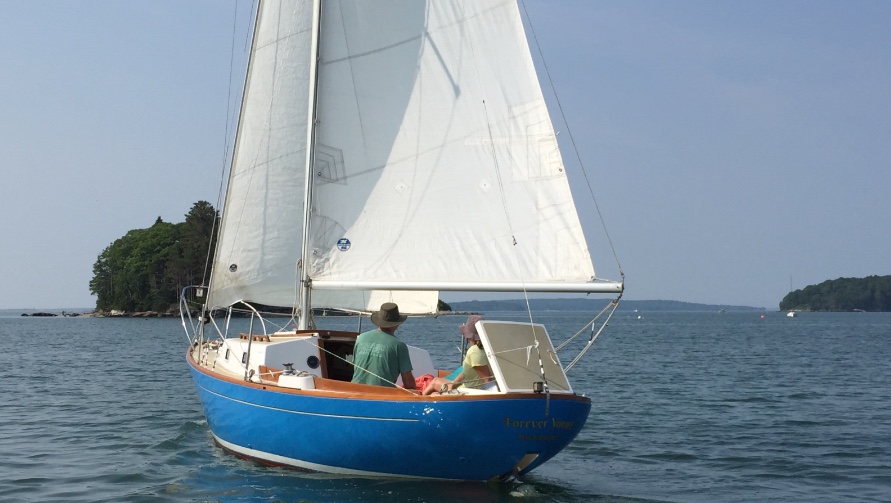
Quickstep 24 A 300 mile sail from Rockland ME to Harwichport, Cape Cod
I had sent the following letter to the previous owner:
Just wanted to let you know that the restored “Rising Son” boat looked great, sailed great, and motored great under her new name “Forever Young”. We got a lot of nice compliments on the paint and brightwork. That 8 hp yamaha was fantastic as we had very light winds and motored over 40 hours over the 2 leg trip with 8 days of sailing.
For the first leg with my wife Lorraine, we sailed, motored and motor-sailed to Port Clyde, Booth bay, Bustin’s island off South Freeport and finished up in Kennebunkport. It was a very fun and gorgeous trip as we enjoyed the dramatic scenery of the Maine coast line while getting to know the boat. Here’s a quick wrap of the second leg I had sent to some friends:
For the second leg of the trip, wind, weather, crew and engine all were great. Our boat, “Forever Young” is now on her mooring at her final destination in Harwichport down the Cape. With my brother Peter, we had a great 55 mile sail last Wed from Kennebunkport ME to the Annisquam river in Gloucester MA. The boat sailed great in these 10-15 knot breezes and handled the occasional 20 knot gust well. We spent the night on the boat docked at the Cape Ann marina surrounded by and dwarfed by sport tuna boats arriving early for the weekend tuna fishing tournament. The guy next to me filled his tank with 800 gallons of fuel while I added about a gallon and a half. On Thursday mother nature only gave us wind for 30 minutes as we left Gloucester and about an hour of wind at the end of the day as we arrived in Sandwich MA, but then left us with no wind and an 8 hour slog of 40 miles motoring in water that you could have rowed a crew shell on as we crossed Massachusetts Bay on a direct line about 15 miles offshore to Sandwich (the eastern end of the Cape Cod Canal) . We spent the night at the Sandwich marina and enjoyed a well deserved dinner and cold beers on shore. Peter’s 29 year old son, Patrick, joined us Fri AM and we motor sailed through the canal and down Buzzard’s bay and through lumpy currents at Woods hole, navigating through the many Rodney Dangerfield “Caddy Shack” boats with large wakes. We then had a great sail to Hyannisport where we stayed the night with my friend, Greg, who set us up with a mooring and beds for the night. Greg’s family’s house is right next to the Kennedy compound (the sailor’s version of friends with benefits). I gave my crew a ride back to their car in Sandwich Sat AM and I solo sailed the last 12 miles to Harwichport. A very fun adventure covering a total of about 300 miles of New England coastline.
Here’s a shot from the first leg earlier in July from Rockland ME to Kennebunkport up in Casco Bay ME off of South Freeport with me and Lorraine.
Don’t think you want to go thru the effort of pulling the O/B on a regular basis – this arrangement is another nod to asthetics at the expense of practicality. I usually pull and flush at mid-season. Other than that, I simply focus on keeping the leg and intake from getting too overgrown with barnicles by brushing on a regular basis.
I just discovered the existence of the Quickstep 24 and I think I’m in love. I have 2 questions: How difficult is it to pull the outboard out of the well after each sail to flush out the salt water? Is there standing headroom down below? Thanks, Larry
Most of us fall in love after seeing a Quickstep. I sail a 21, so I can’t comment about the outboard well, but I can tell you that the 24, like the 21, has sitting headroom below. That’s why the boats are so pretty. There is more than enough room for weekending aboard as we did with our kids when they were small, or just hanging out on the boat. Ours has a port a potty, a fresh water tank, a cooler, and an alcohol single burner stove. It’s simple and it’s perfect.